Kameran aukkoarvo (f-luku) kertoo, kuinka suuresta reiästä valo pääsee objektiivin läpi kennolle. Pieni f-luku, kuten f/2.8, tarkoittaa suurta aukkoa ja paljon valoa. Suuri f-luku, kuten f/11, tarkoittaa pientä aukkoa ja vähemmän valoa.
Aukko ei kuitenkaan vaikuta vain valon määrään. Se määrää myös syväterävyyden eli sen, kuinka suuri osa kuvasta on tarkkana. Suurella aukolla tausta pehmenee kauniisti ja kohde erottuu. Pienellä aukolla taas maisema pysyy terävänä etualasta taustaan. Siksi aukkoarvo on yksi tärkeimmistä luovista työkaluista valokuvaajalle, sillä säädetään sekä valoa että kuvan tunnelmaa.
Vaikka tämän tietää jokainen vähänkin pidempään kuvannut, aukkoarvon merkitys unohtuu yllättävän helposti tilanteen kiireessä. Myös minulle on käynyt useamman kerran niin, että muuten erinomainen kuva on mennyt pilalle väärän aukkoasetuksen vuoksi.
Lintukuvauksessa suuri aukko (pieni f-luku) on usein tarkoituksellinen valinta. Pieni kohde erottuu taustastaan selkeästi, ja kuvaan syntyy kaunis, pehmeä tausta. Kohde, eli lentävä tai istuva lintu nousee esiin juuri niin kuin pitääkin.
Toinen, osittain maantieteellinen syy suuren aukon käyttämiseen on valo. Suomessa ja muualla Skandinaviassa suuri osa vuodesta on hämärää jopa päiväsaikaan. Valovoimainen objektiivi mahdollistaa nopeammat suljinajat ja pienemmät ISO-arvot, mikä on liikkuvaa kohdetta kuvatessa ratkaisevaa. Tämän vuoksi olen itse suosinut jo pitkään kiinteäpolttovälisiä prime-objektiiveja. Ne ovat suuria, raskaita ja kalliita, ja niiden kanssa joutuu käyttämään niin sanottua jalkazoomia. Vastineeksi ne tarjoavat suuren aukon ja erottelevan piirron, joka on monessa tilanteessa korvaamaton.
Prime-objektiivinkaan kanssa ei kuitenkaan kannata tuijottaa pelkkää suurinta aukkoa. Tilanteen mukaan aukkoa pitää myös osata pienentää. Jos kohde on lähellä tai liikkuu nopeasti, syväterävyysalue voi täydellä aukolla jäädä liian kapeaksi, jolloin tarkennus ei riitä kattamaan koko kohdetta.
Tämä konkretisoitui itselleni kuvausmatkalla Kuusamossa. Kuvassa kuukkeli lentää siivet levällään, viistosti yläkulmasta kuvattuna, juuri sellainen hetki, josta syntyy klassinen kuva. Kuvassa on kuitenkin yksi selvä vika: linnun silmät ja pään alue eivät ole tarkkoja.
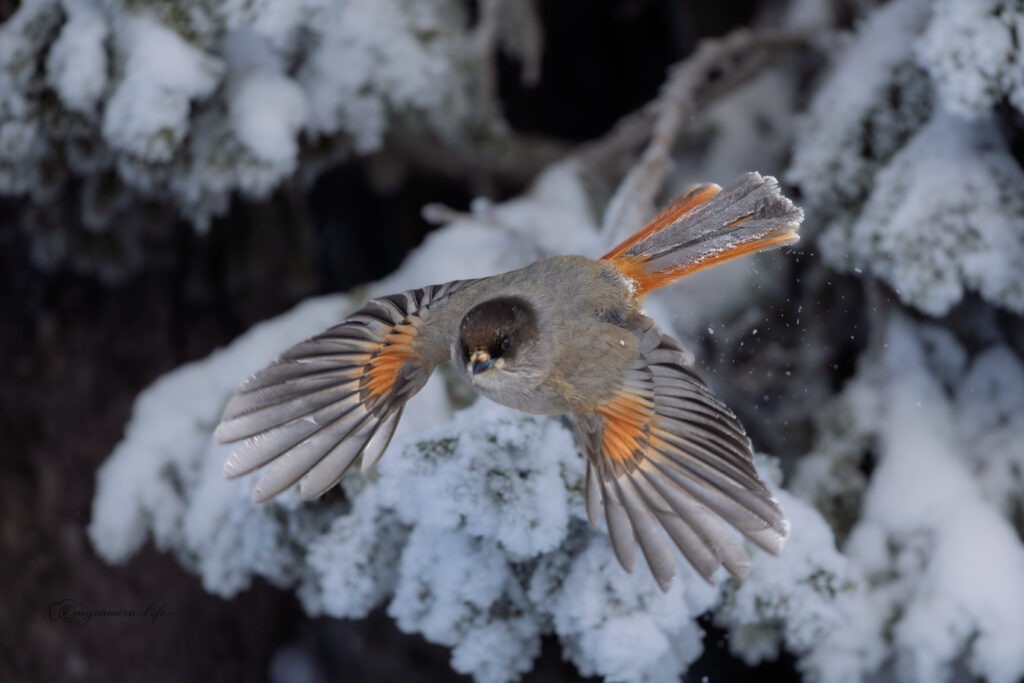
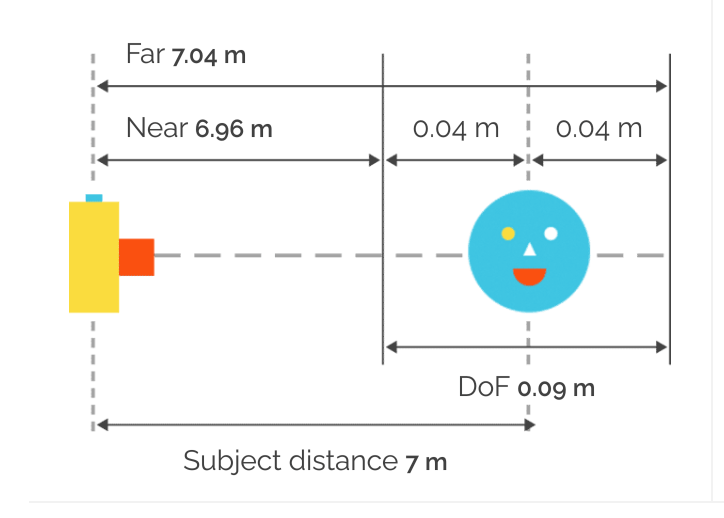
Tarkennus osui hieman väärään kohtaan, ja äärimmäisen suuren aukon sekä lyhyen kuvausetäisyyden vuoksi syväterävyysalue jäi noin kahdeksaan senttiin. Linnun pyrstöstä niskaan ulottuva alue on veitsenterävä, mutta silmät eivät. Lintukuvassa juuri silmien pitäisi olla terävin kohta.
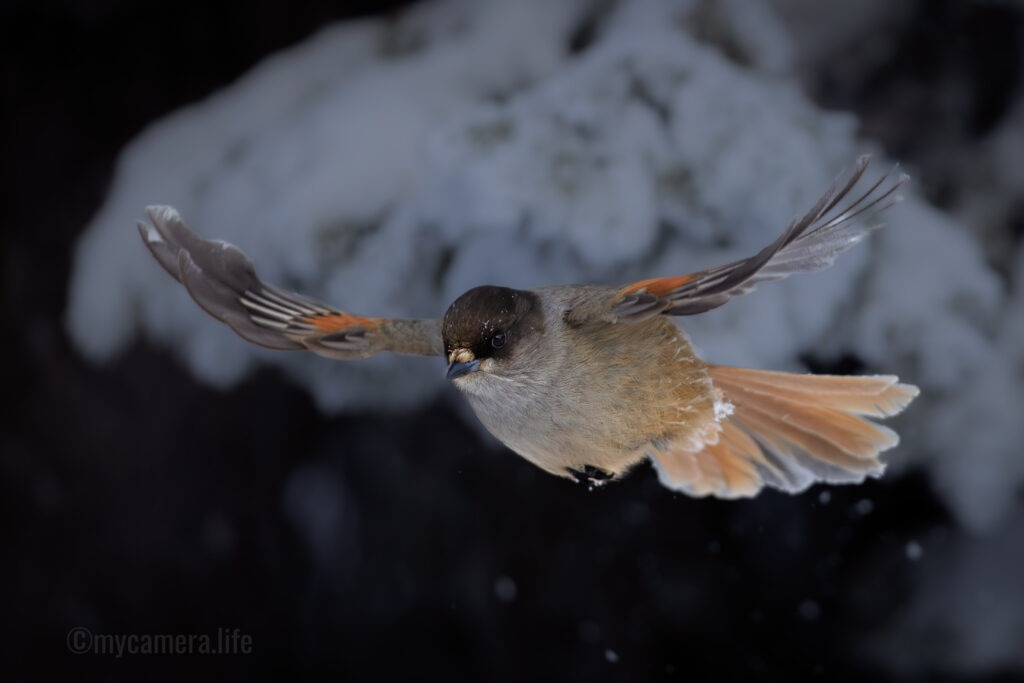
Käytössäni oli Canon EF 300mm f/2.8 IS II USM, yksi tarkimmin piirtävistä objektiiveista mitä on tehty. Se ei ollut ongelma. Ongelma oli aukkoarvo. Seuraavassa ruudussa (tämän blogitekstin pääkuva) tarkennus osui täydellisesti silmiin, mutta siipien asento ei ollut enää yhtä näyttävä.
Jos olisin himmentänyt aukkoa vain yhdellä tai kahdella pykälällä, koko lintu olisi ollut terävä ja kuva täydellinen.
Tämä on kantapään kautta opittu asia: älä tuijota suurinta aukkoa vain siksi, että se on mahdollista. Tarkkaile tilannetta, kohteen etäisyyttä ja liikettä ja säädä aukkoa sen mukaan. Usein parempi kuva syntyy hieman himmentämällä.
In English
The camera’s aperture (f-number) controls how much light passes through the lens onto the sensor. A small f-number, like f/2.8, means a large aperture that lets in a lot of light. A large f-number, like f/11, gives a smaller aperture and less light.
But aperture does more than just control exposure. It also determines the depth of field, how much of your image is in sharp focus. A wide aperture creates a beautifully blurred background, making your subject stand out. A small aperture keeps more of the scene sharp from foreground to background. Aperture is one of the most important creative tools for a photographer; it shapes both the light and the mood of a photo.
Even experienced photographers can forget the importance of aperture in the heat of the moment. I’ve personally ruined otherwise excellent shots more than once by having the wrong aperture set.
In bird photography, a wide aperture (small f-number) is often a deliberate choice. It isolates a small subject from the background and creates a soft, pleasing bokeh. The subject, whether a flying or perched bird, really pops in the frame.
Another, partly geographical reason for using a wide aperture is light. In Finland and across Scandinavia, much of the year can be dim even during daytime. A fast lens allows for shorter shutter speeds and lower ISO, which is critical when capturing moving subjects. That’s why I’ve long favoured prime lenses. They’re often big, heavy, and expensive, and you have to rely on “foot zooming” to frame your subject. The payoff is a large aperture and superb image quality, invaluable in many situations.
Even with a prime lens, though, you shouldn’t blindly stick to the widest aperture. You need to adjust according to the situation. If your subject is close or moving fast, the depth of field at maximum aperture may be too narrow to keep the whole subject sharp.
I learned this first-hand on a photography trip to Kuusamo. I captured a Siberian Jay in flight, wings spread, shot from a slight top angle, exactly the kind of moment that makes a classic image. There was, however, one clear flaw: the bird’s eyes and head weren’t perfectly sharp.
The focus landed slightly off, and the extremely wide aperture plus short shooting distance gave a depth of field of only about 8 cm. From the bird’s tail to its neck was razor-sharp, but the eyes weren’t. In bird photography, the eyes should be the sharpest part.
I was using a Canon EF 300mm f/2.8 IS II USM, one of the sharpest prime lenses ever made. The lens wasn’t the problem; the aperture was. In the next frame (featured image of this blog text), the focus hit the eyes perfectly, but the wings were no longer in that ideal, dramatic position.
Had I stopped down the aperture by just one or two stops, the entire bird would have been sharp and the shot nearly perfect.
This is a lesson learned the hard way: don’t automatically shoot wide open just because you can. Pay attention to the scene, subject distance, and motion, and adjust aperture accordingly. Often, a slightly smaller aperture yields a far better image.
