If you’ve been photographing birds for years, you already know this: the problem isn’t that you don’t know what to do. The problem is that in the moment, there’s no time to do anything.
Early in my bird photography journey, I thought my hit rate depended mostly on field experience and species knowledge. That’s partly true. But at some point, I realised that a modern camera is no longer just a recording device. It’s a decision-making system. And if you don’t understand exactly how it decides, you don’t really control the moment.
The turning point came when I started analysing my camera settings systematically. I stopped changing everything at once. Instead, I focused on one variable at a time and measured its effect on my hit rate. This approach transformed my photography more than any lens or body upgrade ever did.
This post goes into the technical foundation of Pre-Continuous Shooting and the key settings that directly influence success rates. I’ll reference modern mirrorless systems such as the Canon EOS R5 Mark II, but the principles apply broadly to any advanced camera capable of predictive AF and pre-capture functionality.
Pre-Continuous Shooting – System Control, Not Reaction
Pre-Continuous Shooting is a feature in which automatic shooting in continuous shooting drive mode is already in progress before you press the shutter button completely, after you have pressed it halfway for a moment. To prepare for pre-continuous shooting, set the number of images to capture. Note that [PRE] is displayed on the shooting screen during pre-continuous shooting.
With this feature, your camera is not merely reacting to movement. It is actively buffering and capturing frames in anticipation of the critical moment. Your task isn’t only to follow the bird. It’s to manage how the camera executes pre-continuous shooting and focus decisions.
The biggest mistake even experienced photographers make is relying on the camera to “just work” in default settings. Default is a compromise.
When you systematically test your setup, you’ll notice that every setting has a measurable impact:
- what the camera prioritises
- how quickly it switches focus
- how aggressively it tracks
- when it triggers the shutter
This is not fine-tuning. This is mastering the architecture of your imaging system.
What makes Pre-Continuous Shooting especially powerful is that it fundamentally changes the relationship between reaction time and image quality. In traditional bird photography, even highly experienced photographers miss decisive moments simply because human reaction is slower than the event itself. The bird launches, turns, strikes, or changes direction faster than you can physically press the shutter. With this feature, the decisive moment is no longer limited by your reflexes. The camera continuously records a short history of time. Instead of trying to predict the exact instant, you create a safety window around it.
One of the biggest advantages is consistency. Over time, this improves not only your hit rate but also the quality of the images within each sequence. You are more likely to capture the peak wing position, the perfect head angle, or the exact moment of interaction. This leads to stronger image selection and reduces the frustration of “almost” shots that are technically sharp but compositionally weak.
Another major benefit is psychological. When you know that the system is already recording, you become calmer and more deliberate in your tracking. You stop chasing the moment and start observing behaviour. This often leads to better framing and cleaner backgrounds because your focus shifts from panic shooting to controlled anticipation. In practice, this mental shift is as important as the technology itself.
However, the feature demands discipline. It increases the volume of captured data and therefore requires an efficient workflow. Card speed, buffer management, and post-processing strategy become critical. Without a clear approach, the time spent culling images can quickly erase the practical advantages. This is why systematic testing is essential. You need to determine how many pre-captured frames give real value without overwhelming your workflow.
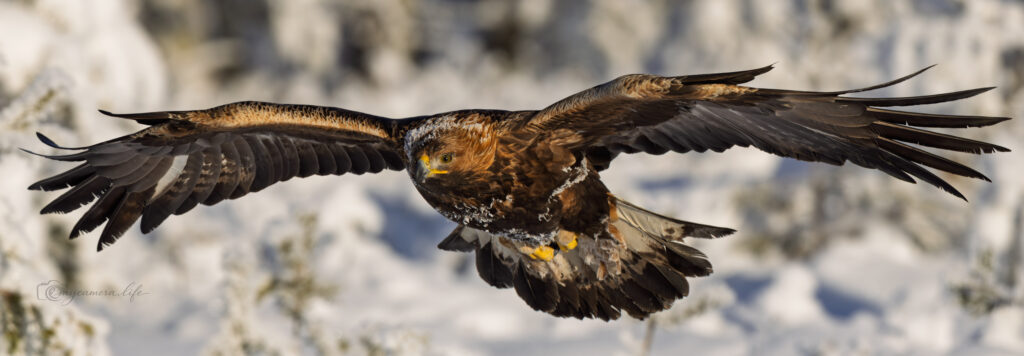
There are also situations where Pre-Continuous Shooting is particularly effective. One classic example is birds taking off from water or ground. Even when you know the takeoff is coming, the exact trigger moment is unpredictable. The slight muscle tension before launch or the micro-pause before movement is almost impossible to time consistently. Pre-capture allows you to focus on tracking and composition while ensuring the initial wingbeat is recorded.
Another scenario is predatory behaviour. Raptors dropping from a perch, kingfishers diving, or herons striking fish all involve extremely fast and unpredictable motion. In these cases, even a delay of a few milliseconds can mean missing the critical frame. Pre-Continuous Shooting shifts the timing problem from reaction to behaviour analysis. Instead of guessing when to press the shutter, you concentrate on recognising the behavioural cues that precede action.
It is also highly effective in chaotic multi-subject environments, such as feeding flocks or territorial interactions. When multiple birds are moving unpredictably, your ability to anticipate individual actions is limited. The camera’s continuous buffering gives you a wider temporal safety margin and increases the probability of capturing meaningful interaction.
Ultimately, Pre-Continuous Shooting is not a shortcut. It is an extension of anticipation. The photographers who benefit most from it are not beginners but experienced shooters who already understand behaviour, light, and timing. The feature amplifies those skills rather than replacing them. When used with intent and systematic testing, it becomes one of the most powerful tools in modern bird photography.
Servo AF Behavior – The Camera’s Nervous System
One of the most undervalued variables in Pre-Continuous Shooting is the servo AF character. The R5 Mark II has moved away from the traditional Case 1-7 system found in earlier Canon bodies. Instead, it offers a more flexible approach with Case Auto, Case Manual, and Case Special modes.
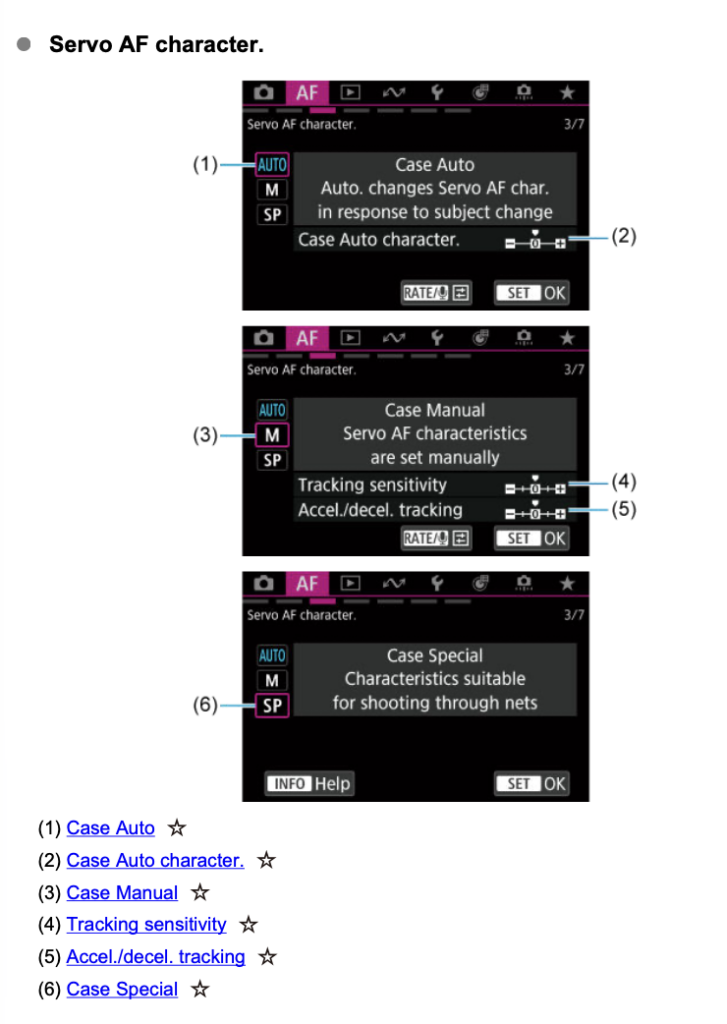
Case Auto allows the camera to analyse the scene and automatically adjust tracking characteristics. In theory, this should adapt to changing conditions without manual intervention. In my testing so far, I experimented with shifting the Case Auto character slider both towards the responsive end (+) and the sticky end (-). After several field sessions, I returned to the neutral position (0), which appeared to provide the most consistent results across varying subject behaviour. However, this conclusion is provisional. The optimal setting likely depends on species, light, and shooting distance, all of which require further systematic testing.
Case Manual is where experienced photographers will have the most control. It provides two critical parameters that can be tuned independently:
Tracking sensitivity controls how quickly the AF system responds when a new object enters the focus area. Higher values make the system more responsive to subject changes but increase the risk of focus jumps when obstacles cross the frame. Lower values create stickier tracking that maintains subject lock even when branches or other birds briefly interrupt the line of sight.
Accel./decel. Tracking determines how aggressively the system predicts subject movement when the bird accelerates or decelerates. This becomes particularly relevant in flight photography, especially during takeoffs, rapid directional changes, or when a raptor transitions from soaring to a hunting dive.
Through my initial field testing, I found that Tracking sensitivity -1 and Accel./decel. Tracking 0 produced the most reliable results for the raptors and waterfowl I typically photograph. The slightly sticky tracking reduced the number of frames lost to momentary occlusions, while neutral acceleration tracking avoided over-prediction during unpredictable flight paths.
That said, this is an ongoing process. Small passerines, for example, may require entirely different settings due to their erratic movement patterns. I suspect that tracking sensitivity closer to 0 or even +1 might work better for warblers or tits in dense forest environments, where rapid subject switches are more common than occlusion. This remains to be tested systematically.
The advantage of this system over the old Case profiles is precision. Instead of choosing between seven predefined compromises, you can tune each variable independently based on your specific shooting scenario. The downside is that optimisation now requires more deliberate testing. There is no longer a simple “use Case 3 for birds in flight” recommendation. You must determine what works for your subjects and your tracking style.
Case Special is designed specifically for shooting through obstacles such as nets, fences, or dense foreground vegetation. The algorithm attempts to ignore these obstructions and maintain focus on the subject beyond. This mode is primarily intended for sports photographers working in stadiums or arenas, but it may occasionally prove useful in wildlife scenarios where you are forced to shoot through physical barriers. I have not yet tested it extensively, as my typical bird photography rarely involves such conditions.
From experience so far, tweaking Servo AF character influences hit rates as much as—or more than—AF area selection or shutter speed. But unlike those variables, the effects are subtle and highly context-dependent. This is not a setting you change once and forget. It is a parameter that should evolve as you gain experience with different subjects and environments.
AF Area Selection – Precision vs. Robustness
Single point, expanded, and whole area modes are not merely convenience options. They define your entire tracking strategy and, in many ways, your tolerance for uncertainty in the field.
Single point offers maximum precision and is ideal when you want full control over exactly where the focus lands, especially in situations where composition and eye-level sharpness are critical. However, it is also the most vulnerable to rapid or unpredictable movement. In real bird photography, perfect hand stability is rare, and even small tracking errors can result in missed focus.
Expanded or flexible zones introduce a safety margin. They allow minor errors in hand movement or tracking, which is particularly valuable in dynamic flight or when working with long focal lengths. The trade-off is reduced precision. The camera may choose a slightly different focus point than you intended, but in many situations, that is still preferable to completely losing the subject.
Whole area tracking combined with animal detection can significantly improve average hit rates. It sacrifices a degree of manual control, but in fast-action scenarios, this often leads to a higher keeper ratio. The system continuously evaluates the scene and attempts to maintain subject lock, which is especially beneficial when the bird moves unpredictably or crosses complex backgrounds.
Eye-AF for birds on the R5 Mark II is highly reliable under good lighting conditions. It can track even small bird eyes in Pre-Continuous Shooting mode and maintain precise focus during rapid bursts. However, real-world experience quickly reveals its limitations in challenging conditions. In low light or when photographing species with dark eyes surrounded by equally dark plumage, the system may struggle to consistently detect the eye. Contrast becomes insufficient, and the algorithm may lose the eye intermittently.
In these situations, the most important skill is not blind trust in detection, but awareness of where the focus shifts when eye tracking fails. The camera may transition to the head, body, or even the background without an obvious warning. If you are not monitoring this behaviour, your hit rate will drop despite technically advanced autofocus.
This is where expanded zones or controlled whole-area tracking can become more reliable than strict eye detection. By allowing the system to focus on the head or upper body when the eye is not clearly visible, you maintain acceptable sharpness and increase overall success. For example, in dawn or dusk shooting, or when working in dense forest environments, it is often more productive to prioritize subject tracking stability over absolute eye precision.
Another practical scenario is backlit or high-contrast situations. When the bird is partially in shadow or the eye falls into a dark region, the detection system may fluctuate. In such cases, combining Pre-Continuous Shooting with a slightly more forgiving AF area allows the camera to maintain subject lock long enough for the eye to reappear in usable light.
Ultimately, AF area selection is not a static choice. It is a dynamic decision based on light, contrast, species, and behaviour. The more experience you gain, the more you realize that precision and robustness are not opposites but tools. The key is understanding when to shift between them and, most importantly, observing how the system behaves when ideal eye detection is no longer possible.
Pre-Capture / Pre-Continuous Shooting Benefits
Pre-Continuous Shooting is among the most impactful innovations in modern AF systems. It shifts the decision point backwards in time, continuously buffering images once you press the shutter halfway.
Benefits:
- reduces timing errors
- increases chances of capturing critical moments
- works seamlessly with high-speed electronic shutters (up to 40 fps)
Drawbacks:
- adds storage and post-processing overhead
- can slow the learning of manual anticipation skills
- requires careful buffer management
Pre-Continuous Shooting doesn’t replace anticipation—it statistically improves odds. The question isn’t whether to use it. It’s when it provides measurable advantage.
Shutter Mode – Electronic vs. Mechanical
Electronic shutters are the default for many bird photographers: quiet, fast, and continuous.
In modern cameras like the R5 Mark II, rolling shutter effects are largely negligible in normal bird photography. The sensor readout is extremely fast, so wing movement or rapid flight rarely causes noticeable distortion. True global shutter is still absent, but the high frame rate and sensor speed make artefacts minimal.
Fully mechanical shutters are still an option, but in most cases, the minimal delay of the electronic shutter combined with 40 fps high-speed continuous shooting makes it the preferred choice. Only in very extreme or highly specialised scenarios would rolling shutter artefacts become a concern.
The key consideration remains timing: electronic shutters allow you to capture decisive moments with minimal lag, and field testing with your typical subjects is the best way to confirm settings for your workflow.
Release Priority – Capture the Decisive Moment
Release priority is the philosophical core of Pre-Continuous Shooting.
If the focus isn’t perfectly locked but the moment is critical, do you want the image or not?
Many seasoned photographers choose release priority because Pre-Continuous Shooting shifts focus management ahead of time. When the moment arrives, triggering is paramount.
Focus priority is safer for absolute sharpness but may cause the camera to hesitate at the worst possible moment.
Systematic Testing – The Only Way to Improve
The biggest mistake is not wrong settings. It’s not knowing which setting works.
Changing multiple variables simultaneously gives no insight into causation.
I use a simple framework:
- one setting at a time
- sufficient data
- keeper rate as the primary metric
- analysis of rejected frames by reason
This approach is more akin to scientific research than casual photography. But it’s the only way to exploit the full potential of a modern imaging system.
Practical Effects
The biggest change wasn’t the number of images. It was confidence.
When you know how the system behaves:
- you don’t hesitate
- you don’t adjust mid-flight
- you don’t blame the gear
Instead, you focus on what really matters: behavior, light, and timing.
Pre-Continuous Shooting becomes systematic rather than reactive.
Is More Always Better – Evaluating the Real Value of Pre-Continuous Shooting
This leads to a critical and often uncomfortable question. If technology produces ten times more images but improves your hit rate only two times, is it actually worth it?
At first glance, the answer seems obvious. More usable images should always be better. But in practice, the equation is more complex. The value of modern high-speed systems, such as Pre-Continuous Shooting, is not defined only by the number of keepers. It must also be measured against time, workflow, and cognitive load.
When you activate features that generate massive image volumes, you are not only changing your shooting. You are fundamentally changing your entire photographic process. Every additional frame must be transferred, backed up, reviewed, and evaluated. The bottleneck shifts from the field to the editing desk. For experienced photographers, this often becomes the real limiting factor.
From my own experience, the biggest trap is assuming that more data automatically leads to better results. In reality, excessive volume can dilute attention. When you scroll through thousands of nearly identical frames, decision fatigue increases. The risk is that you spend more time searching than improving. Over time, this can even reduce your ability to recognize subtle differences in peak moments.
However, this is only one side of the equation. The real advantage of Pre-Continuous Shooting is not the absolute number of keepers but the probability of capturing rare and unrepeatable behaviour. If the feature allows you to capture moments that would otherwise be missed completely, even a modest increase in hit rate can justify the additional workload. For example, a raptor strike, a sudden mid-air interaction, or a unique behavioural sequence may occur only once. In such cases, the value of a single decisive frame can outweigh the time required to process thousands of images.
The key is therefore not maximising the number of frames but optimising information density. The goal is to increase the proportion of meaningful variation in your sequences. This is where experience becomes critical. As your anticipation improves, Pre-Continuous Shooting acts as a precision safety net rather than a timing replacement. Instead of producing random excess, it captures subtle micro-variations around the decisive moment.
This also changes how you evaluate success. A twofold increase in hit rate is not trivial. In wildlife photography, where many situations are unpredictable and uncontrollable, doubling the probability of success can significantly reduce long-term frustration and increase the quality of your portfolio. The psychological impact alone is substantial. Knowing that you are less likely to miss critical behaviour allows you to focus more on observation, light, and storytelling.
Still, the feature is not universally beneficial. In predictable situations, such as slow flight, perched birds, or rehearsed behaviour at hides, the gain may be marginal. In these cases, disciplined timing and lower frame rates may produce equally strong results with far less data overhead.
The most rational approach is selective deployment. Use Pre-Continuous Shooting when uncertainty and speed are high, and scale it back when behaviour becomes predictable. This preserves both efficiency and image quality.
Ultimately, the question is not whether the technology is worth it in general. The question is whether it improves your ability to capture images that matter to you. If it only increases volume, it is a burden. If it increases the probability of capturing moments that define your work, it becomes one of the most powerful tools available in modern bird photography.
Quantifying the Trade-Off
To move beyond theory, I tested this systematically in real field conditions over three months. I focused on fast and unpredictable raptor behaviour, using Pre-Continuous Shooting with a fixed number of pre-captured frames at 40 fps. Unlike some earlier implementations, the system is not configured by time but by the number of images stored before the shutter is fully pressed. This fundamentally changes how the feature should be optimised.
The key variable is no longer time but the anticipation window, which is directly defined by frame count and frame rate. In practical terms, the length of the pre-capture window can be estimated as:
anticipation window = number of pre-captured frames / frames per second
At 40 fps, every 40 frames represents approximately one second of buffered time. This means that even small changes in frame count significantly affect how far back in time you are actually recording.
For example, a setting of 10 pre-captured frames gives only about 0.25 seconds of anticipation. This may be sufficient for predictable takeoffs or flight transitions, where the behavioural cue is clear, and timing uncertainty is small. However, for highly impulsive events such as raptor strikes, this window is often too short. The decisive moment may occur before your brain fully processes the visual signal.
Increasing the buffer to 20 or 30 frames expands the anticipation window to roughly 0.5–0.75 seconds. This creates a much more forgiving safety margin and allows you to react to behaviour rather than to the exact moment. In practice, this was the range where my hit rate improved most noticeably. It reduced the number of missed sequences without overwhelming the workflow.
Beyond that, further increases produced diminishing returns. Larger frame counts significantly increased data volume while adding relatively little practical benefit. The reason is behavioural rather than technical. Most meaningful bird actions unfold within a limited time window once the pre-action cues appear. Expanding the buffer beyond this behavioural window mostly records redundant frames.
This also revealed an important insight: the optimal frame count depends strongly on species and situation. Small passerines, for example, often show extremely rapid and subtle movement before flight. In these cases, a slightly longer anticipation window is beneficial. Large raptors, on the other hand, often display clearer pre-action cues, allowing a shorter buffer with less data overhead.
The results of my field testing reflected this balance.
- With a moderate pre-capture frame count at 40 fps, I generated approximately 3,200 images per field day
- My keeper rate increased from 4.2% to 9.1%
- Post-processing time per session increased from 2 hours to 4.5 hours
- The net gain was 291 keepers compared to 134 keepers per day
Was it worth it?
For rare and unpredictable behaviour such as raptor strikes, mid-air interactions, and sudden takeoffs, absolutely. The increase in probability of capturing decisive moments was significant and directly improved my portfolio.
For slower and more predictable subjects such as perched songbirds, the benefit was much smaller. In these situations, the additional data volume did not justify the increase in workflow time. In fact, the selective use of the feature produced better long-term efficiency.
This reinforced a key insight: the real value of Pre-Continuous Shooting is not speed or volume. It is selectivity. The photographers who benefit most are those who apply the technology strategically rather than universally.
Conclusion
A modern camera doesn’t make you a better photographer. But it can make you more effective if you understand it deeply.
Technical mastery is not the opposite of creativity. It liberates it.
When the system behaves predictably, you can focus on why you started photographing birds in the first place: the irreplaceable, fleeting moments.
FAQ – Deep Questions on Pre-Continuous Shooting
Should experienced shooters rely on animal detection or manual AF?
Situationally. Detection increases average success, but manual control remains critical.
Is Pre-Continuous Shooting necessary for modern bird photography?
Not strictly, but it provides a statistical advantage in impulsive scenarios.
Which single setting most affects hit rate?
Servo AF character, including Case profiles and tracking sensitivity.
Electronic or mechanical shutter?
Electronic is preferred for timing and speed. Mechanical may be used in extreme cases.
How do you know settings are optimal?
When you can reliably predict camera behaviour across typical field situations.